
The universe has been telling me to write this post for a very long time. The first time was a year-ish ago, when I googled how to get WooCommerce category data with an ID and couldn’t find a clear answer. “Hey, this is a pain to find an answer for – this should be a blog post!” The second time was after I had posted a question on the WordPress Stack Exchange to find an answer, and then I answered it myself. “Whoa – I figured this out! I should tell people about this!”
Then that question eventually ended up earning me a “most popular question” badge. “Damn it, Rachel, people want to know about this – write a damn blog post!”
Okay, so I didn’t do it. Time passed and it was exactly yesterday ( when I began writing this post ), I was working in WooCommerce again, in the zone, went to google, and this happened:
Today's fail: Google how to do something in #WordPress. End up at the Stack Exchange question that you answered yourself. *face palm*
— Rachel R. Vasquez (@RachelRVasquez) September 2, 2015
Yep, that’s right everyone. I ended up googling the same problem I had already once resolved and ended up at the same Stack Exchange question I both asked and answered. All right, universe. You win this round.

To make sure I never ever forget I know how to do this again, I’m going to write it down! How to get the WooCommerce product category name, link, image, all the things with PHP so long as you have an ID to use, step by step, in tutorial form.
Before We Get Started:
- This assumes you’re familiar with PHP loops, objects and variables.
- This is a WooCommerce tutorial yay!
- I am using Advanced Custom Fields for this walkthrough, but you can use other methods like a regular Custom Field and re-work this solution to your purposes.
- I am getting category information on a page other than the category archive. If you’re on a category archive, check this WooCommerce documentation first for a head start. I found that the method there and the method I’m writing here are a little different depending on the template you’re working in.
- This solution is meant to work inside the loop.
Step 1: Setting up your ACF Fields
If you’re already familiar with Advanced Custom Fields or have your own set up already, feel free to skip down to Step 2.
The first thing we’re going to do, is set up our fields using the Advanced Custom Fields plugin. This is where the user will enter an ID number via the dashboard, and we’re going to write code that will make use of that number. If you’re not already using this plugin, you can also make use of WordPress’ native Custom Fields. This tutorial solution is tailored for ACF, but the only difference is the method in which we retrieve the ID from the user. If we have a custom field labeled “ID Number”, we’d use get_post_meta to retrieve that value within the loop. It would look something like this:
$id_number = get_post_meta( get_the_ID(), 'id_number', true );
echo $id_number;
You would then convert that value from the custom field from a string to an integer before proceeding. That’s not shown in the above example, but will be shown as we continue this walkthrough using ACF. Then the rest of the walkthrough’s logic should apply whether using a custom field or ACF.
With ACF, in my case, I set up Field Groups per page. This Field Group was created for my homepage, and I needed to create several “modules” that the user can re-arrange. Therefore I had to make use of the ACF add on for Flexible Content. You don’t have to do things this way, in fact, you can just add a regular field to your Field Group. I do recommend however, getting the ACF Repeater add on if you’re expecting the user to put in several ID numbers. If not using the repeater, you can create a field for each ID that the user needs to enter instead. The code, however, will be a little different than my solution though.
So here’s what my ACF Fields look like once set up. In the Custom Fields section of the dashboard once the plugin is installed, I created a Field Group called Homepage. I also set the rules for this Field Group to only appear on a page called “Home”. Here you’d set this to whatever page or post you need the fields to appear on.
Then inside that group, I created a Flexible Content Field called Homepage Modules.

Inside Homepage Modules, I created a Layout called Sub-Category Module. You can name these fields whatever suits you, but just mentioning how I set up for those it’ll be helpful for.
What’s important here isn’t the labels you’re giving all these ACF fields, but the “names” as these are what we’re using in the actual code. See how below we have the label as “Sub-Category Module” but the name is “subcat_module”? The name is what we’ll need in the code so definitely consider naming them something obvious to you. I also like to abbreviate the subfields in a “Module” (Layout) by their Layout’s name. So the Layout is Sub-Category Module but the fields inside are abbreviated with sm – so sm_subcategory_block. This is just my personal preference. Anyway, moving on!

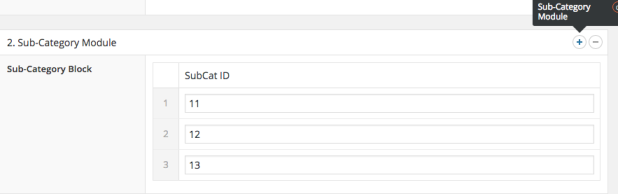
Inside the Layout for Sub-Category Module, I created a repeater called Sub-Category Block. This contains the repeatable fields that the user can just add for each ID they need to enter.

Inside the Sub-Category Block fields, I’ve added the subfield that repeats, labeled SubCat ID and named subcat_id. These are the actual fields where the user puts their IDs. This field is set as a text field in “Field Type” and “No Formatting” in the Formatting section. The screenshot above may have cut that part off.
So in summary, this is what’s happening since it might be hard to grasp from the screenshots in pieces. Below are the field type followed by what I labeled it as and their names for code use. I bolded the two field names we’re going to use for easier reference when we get to the next step.
- Field Group: Homepage
- Flexible Content: Homepage Modules/ homepage_modules
- Layout: Subcategory Module/ subcat_module
- Repeater: Sub-Category Block/ sm_subcategory_block
- Repeater Field: SubCat ID/ subcat_id
- Repeater: Sub-Category Block/ sm_subcategory_block
- Layout: Subcategory Module/ subcat_module
- Flexible Content: Homepage Modules/ homepage_modules
This is what the fields look like on the page I set as the homepage to the user. They can select the Sub-Category Module via the “plus” icon, then add IDs via the SubCat ID fields. I also limited it so the user can only add 3 IDs.
Step 2: Get ID from ACF Field
Once the fields are set in ACF, we’re ready to write the PHP to retrieve those fields in our template. I created a custom front page template by naming the file front-page.php. You can work with whatever template you need this for – just make sure we’re working in the loop. If you’re trying to override WooCommerce templates, there’s some documentation for overriding WooCommerce templates here.
In our template, we loop through the fields using have_rows from ACF. This uses the repeater name and repeater subfield’s names which I had bolded in Step 1 for reference. We grab the IDs using get_sub_field and save it to a variable. We use this instead of the_sub_field because we don’t want to output that value just yet. We just want to retrieve it. Here’s what that looks like so far:
<?php

if( have_rows('sm_subcategory_block') ){

	// loop through the rows of data
	while ( have_rows('sm_subcategory_block') ) : the_row();

		$subcat_field = get_sub_field('subcat_id'); //our repeater field

	endwhile;

}//end have_rows loop
You can test that this is outputting by using var_dump with the $subcat_field variable or whatever you named it. This is, of course, assuming you’ve gone into the dashboard and filled in IDs for those fields to work with.
Step 3: Convert ID into an Integer
Next we’re going to convert that value from the get_sub_field variable into an integer. By default, the value is a string. Some functions may throw errors if we use this ID as a string rather than an ID. So this is a good precaution to ensure that doesn’t happen. I decided to use (int) rather than intval() after finding this Stack Overflow discussion about performance. Now I’m not an “official” PHP developer so if there are better ways to do this, let me know. But here’s what it looks like converting our variable to an integer, and saving that to a new variable.
$subcat_field_int = (int)$subcat_field; //convert string to int
All together with our loop, it looks like this so far:
<?php

if( have_rows('sm_subcategory_block') ){

	// loop through the rows of data
	while ( have_rows('sm_subcategory_block') ) : the_row();

		$subcat_field = get_sub_field('subcat_id'); //our repeater field
		$subcat_field_int = (int)$subcat_field; //convert string to int

	endwhile;

}//end have_rows loop
Step 4: Use the integer to get all the things!
Now that we have an integer, and we know all of our IDs pulled from the dashboard will be integers, we’re free to use that integer variable in whatever functions we want. Woohoo!
Here’s how we get the WooCommerce product category as an object with the get_term_by function and our integer variable $subcat_field_int:
$woo_category_obj = get_term_by( 'id', absint( $subcat_field_int ), 'product_cat' ); //get category obj
As you can see above, we also save that object to another variable. This way we can use that variable to grab handy things like the category name:
$woo_category_name = $woo_category_obj->name; //get category name
You can see what else can be outputted by using var_dump on the object variable – in my case $woo_category_obj.
Now let’s go back to using the integer variable. We can also use that integer variable, $subcat_field_int, for other functions that use IDs like get_term_link which will get the category link:
$woo_category_link = get_term_link( $subcat_field_int, 'product_cat' ); //get category link
What if we want to get the category thumbnail? In WooCommerce, by default, thumbnail images can be uploaded per category so what if we want to get those? First we need to use the integer variable with a WooCommerce function called get_woocommerce_term_meta. What this does is output all the meta (like post meta) for that category. I found this function when I found this documentation page for displaying a category image on a category archive.
We specifically tell the get_woocommerce_term_meta function that we want the meta for the thumbnail ID. Once we have that thumbnail ID, we save that to a variable that I called $woo_cat_img_id. Then we use it in the wp_get_attachment_url function to output the source url for our image. As usual, we save that to a variable as well:
$woo_cat_img_id = get_woocommerce_term_meta( $subcat_field_int, 'thumbnail_id', true ); //get attachment id
$woo_cat_img = wp_get_attachment_url( $woo_cat_img_id ); //get image
So just by having the category ID, we were able to grab the category names, the category links, and their assigned thumbnails so far.
Step 5: The final result!
Now that we have all this data from the WooCommerce product categories, and in our template, the data will be repeated per ID that’s written in by the user. So if there are three IDs on the dashboard, the category link, name, and image that I’ve pulled will be shown for all three once I echo those values out. Here’s what it looks like altogether with some html wrapped around it.
<ul class="hp-cat-grid">
	<?php

	if( have_rows('sm_subcategory_block') ){

	// loop through the rows of data
		while ( have_rows('sm_subcategory_block') ) : the_row(); ?>

			<li class="hp-subcats-item">
				<?php

	    		$subcat_field = get_sub_field('subcat_id'); //get field value
	    		$subcat_field_int = (int)$subcat_field; //convert string to int

	    		$woo_category_obj = get_term_by( 'id', absint( $subcat_field_int ), 'product_cat' ); //get category obj

				$woo_category_name = $woo_category_obj->name; //get category name

				$woo_category_link = get_term_link( $subcat_field_int, 'product_cat' ); //get category link

				$woo_cat_img_id = get_woocommerce_term_meta( $subcat_field_int, 'thumbnail_id', true ); //get attachment id
				$woo_cat_img = wp_get_attachment_url( $woo_cat_img_id ); //get image url

				?>

				<a href="<?php echo $woo_category_link; ?>">
					<div class="hp-cat-bar">
						<h2 class="hp-cat-name">
							<?php echo $woo_category_name; ?>
						</h2>
					</div>
					<img src="<?php echo $woo_cat_img; ?>" alt="" class="hp-cat-image"/>
				</a>

			</li>

		<?php endwhile;

	} //end of subcat rows

	?>
</ul>
And that’s all folks! I’m still inexperienced when it comes to working with WooCommerce, and I know WooCommerce has a lot of it’s own functions I may be unfamiliar with. So if any WooCommerce gurus have any tips or suggestions for the method I wrote about here, I’d love to hear it!
Now that I’ve finally published this tutorial, I’ve learned two things. One, I re-learned the solution to my WooCommerce category problem, especially now that I’ve written it down. Two, never ignore the universe. The universe is the boss…
I have followed what is documented above and still can’t get anything to show up. When I reload the page.
Here is my final code.
name; //get category name
$woo_category_link = get_term_link( $subcat_field_int, ‘product_cat’ ); //get category link
$woo_cat_img_id = get_woocommerce_term_meta( $subcat_field_int, ‘thumbnail_id’, true ); //get attachment id
$woo_cat_img = wp_get_attachment_url( $woo_cat_img_id ); //get image url
?>
<a href="”>
<img src="” alt=”” class=”hp-cat-image”/>
I added this to my front-page.php, is that my problem, do I have to add it to a woocommerce template? Any help would be appreciated.
Thanks